Last Labor Day holiday, we had our very own Pusakalye Race or it's internationally called around the world Alleycat Race. It's a race for fixed gear riders. It was Pusakalye's first anniversary, and mine as well. How time flies so fast when you're having fun indeed. I have been riding fixed gear now for a year, yey for me; and I thought I'd give something back to the community, new riders. Here's what I have accumulated so far:
What is a fixed gear?
"Fixed gears are the oldest form of drivetrain on bicycles. They are extremely simple from a mechanical standpoint, and this simplicity tends to be attractive to some riders. The 'fixed' refers to the lack of a freewheeling mechanism on the bike, so whenever the wheel is moving so are the pedals, and vice versa. If you pedal forward, you move forward, and if you pedal backward, you move backward."
Source: http://daviswiki.org/Fixed_Gear_Bicycles
"Fixed gears are the oldest form of drivetrain on bicycles. They are extremely simple from a mechanical standpoint, and this simplicity tends to be attractive to some riders. The 'fixed' refers to the lack of a freewheeling mechanism on the bike, so whenever the wheel is moving so are the pedals, and vice versa. If you pedal forward, you move forward, and if you pedal backward, you move backward."
Source: http://daviswiki.org/Fixed_Gear_Bicycles
Have you seen the video?
HANDLE BARS.
There 3 major kinds of handle bars, the classic drop bars, the bullhorns and the riser bars. Here's my experience of each.
1. Riser Bars or Risers. I started with a riser bar. I would say this is one of the easiest and most maneuverability you can have when you're in the city. The shorter is the better, for some, so you can easily move your way around traffic. If you're going to cut it short, it should be proportion to your body because if not, you'd feel suffocated during long rides.
 |
| Thanks to Google for this photo. Where else can you place your hands?! |
CONS: One of the cons with this particular bar is its minimal hand positions. Basically, there are only 2 places you can place your hand, on the outer most part of the bar and the center, near your stem. You'd tire easily during long rides and pain will eventually get the most of you.
2. Drop Bars. The second kind of handle bars I tried. The first time I installed it in my bike, it was "liberating." Because of it's "aerodynamic" design, just like the ones you see on road bikes, you'd know why. If you're also going for that "classic" look, like everyone nowadays are doing restoring old bikes, this is the way to go.
 |
| You can check an article here about different drop bar hand positions. Just remove the brakes for a fixie. |
PROS: Increase speed, more hand positions. Aesthetically pleasing to that classic look for your bike.
CONS: Because of it's design, it was harder to maneuver than the riser bars.
3. The Bullhorns. Just like what the name says, it really looks like a bull's horns. If you're new to the fixed gear scene, I suggest going for a riser bar or a bullhorn. I switched to bullhorns because I thought my prototype frame was my size but I found out that it was a little bit short for me. One of the best ways to compensate for short frames is this because of it's "extended" design. When I switched to bullhorns, I can easily skid because of it's "buelo." It's like you have something or an extended space in front of you that would give you that less effort to skid.
 |
| By the way, if you have the budget, get those bullhorns that has a flat surface on them(for OS), it helps. |
PROS: You can easily learn how to skid here and more hand positions. If you think your frame is short for you, and couldn't find a long stem, you can actually use this for compensation like I did.
CONS: I can't think of any right now..lol The reason why I changed back to drop bars because I was going for the classic look.
TIRES:
Eversince, I got my first folding fixie bike, it was only last month that I changed my tires. Maybe because I only started skidding per say when I removed my front brakes was around November last year. My Tires were Kenda Kwik Roller. A lot of my friends though uses what they call Randonneurs by Vittoria. I haven't had the pleasure of trying them myself but I've heard good reviews.
Difference between 28c's and 23c's:
For some people, they prefer 23c's because of it's sleek/thin suave look like those classics. Some would prefer thick 28c tires for their thick rubber because of it's clearance on some standard forks and longer tire life because of it's thickness. Right now, I'm using 28c's and planning to go 23c's, don't get me wrong, I do like 28c and it's has a really nice clearance on my bike right now. But according to a good friend of mine, I can actually let a frame builder cut my standard fork and make them shorter so that when I use a 23c tire, it will still have a nice clearance.
 |
| Notice how near the rubber is with my fork? We call that "clearance," some prefer it less or almost nothing at all. |
CRANKS & COGS
This is a crank, a single speed crank:
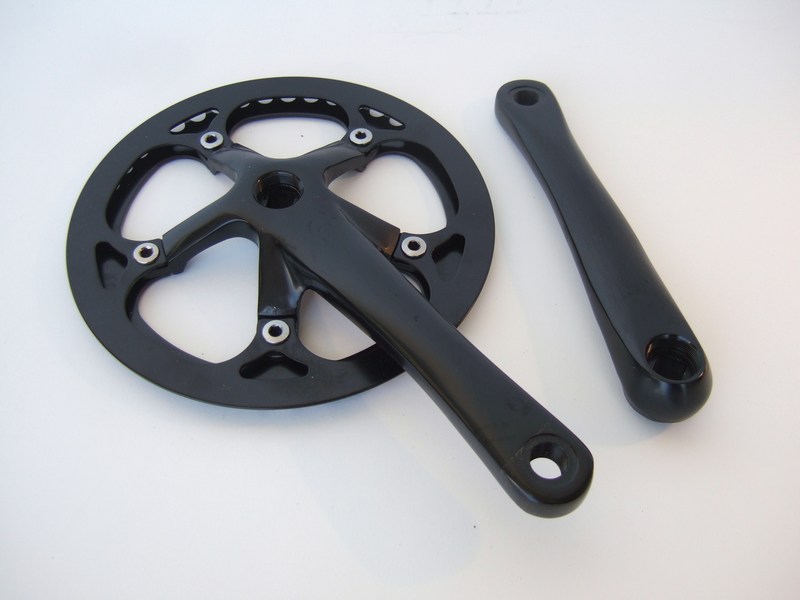
A crank and a cog goes hand in hand. Below is a basic "formula" if you want to know if your getting a crank or a cog is going to be easy/light or hard/heavy to ride:
1. The bigger the crank(teeth) + the smaller(teeth) the cog, the harder it is to skid/pedal.
2. The smaller the crank + the bigger the cog, the lighter/easier it is to pedal/skid.
Entry/normal level would be 42/46/48 teeth for crank size and 16/17/18 respectively for cogs. I started out with a 46t and 16t and was quite easy to learn just after a few weeks. But if you're buying an expensive crank, I suggest buying a higher crank size and just adjusting your cog smaller as you progress so it would be cheaper.
In the long run, for some people, the bigger the crank size, the farther you get with other riders, but that's not always the case. During uphill, it will be harder for people with bigger crank size to go uphill than the people who have smaller crank size. Imagine a circle, the bigger the circle, the more surface you get to cover rather than a smaller circle, but going uphill, the smaller circle has more advantage than the bigger circle, got that?
Toe Clips vs. Foot Straps.
Basically, if you have what they call "overlap" where your shoes/feet hit the front wheel when turning, use a foot strap. It eliminates the overlap. A toe clip pedal for me is better because the first pedal I used was an MKS GR9.

Notice the metal protruding at the back part/underneath of the pedal? The purpose of that is, when the pedal is not in use, it automatically turns upside down like the one on the right. Now just flipping it with the toe part of your shoes, it can be easily turned around and easily put your foot inside. But of course, you have to be careful with the overlap.
Basically, everything here is just my opinion. Of course, like any other bke project, it is entirely up to you how you want your bike to look like. These are just guidelines to help you decide on some of the parts your getting.
Peace out! Good vibes, good rides!

No comments:
Post a Comment